Getting around TV App Geo-Blocking
Executive Summary
This blog post explains how Policy Routing on a Linux server together with commercial VPNs to other countries can help you to put your client devices (TV, smartphones) logically into the internet of other countries in order to get around geo-blocking.
Background
The idea or merely, the need for this approach, surged when I installed an app of a Portuguese TV provider and could not even watch the news journal due to geo-blocking. Additionally, I wanted to have a comfortable solution with which I can switch the TV to different countries while I am sitting in my TV chair with my smartphone at hand 😁.
Preconditions
In order to use the approach described here, you should:
- … have access to a Linux machine which is already properly configured on its principal network interface (e.g., eth0)
- … have the package openvpn installed on the Linux machine (preferably from a repository of your Linux distribution)
- … have access to a commercial VPN provider allowing you to run several parallel client connections on the same machine
- … have knowledge of routing concepts, networks, some understanding of shell scripts and configuration files
- … know related system commands like sysctl
- … familiarize yourself with [1], [3], [4], [5]
Description and Usage
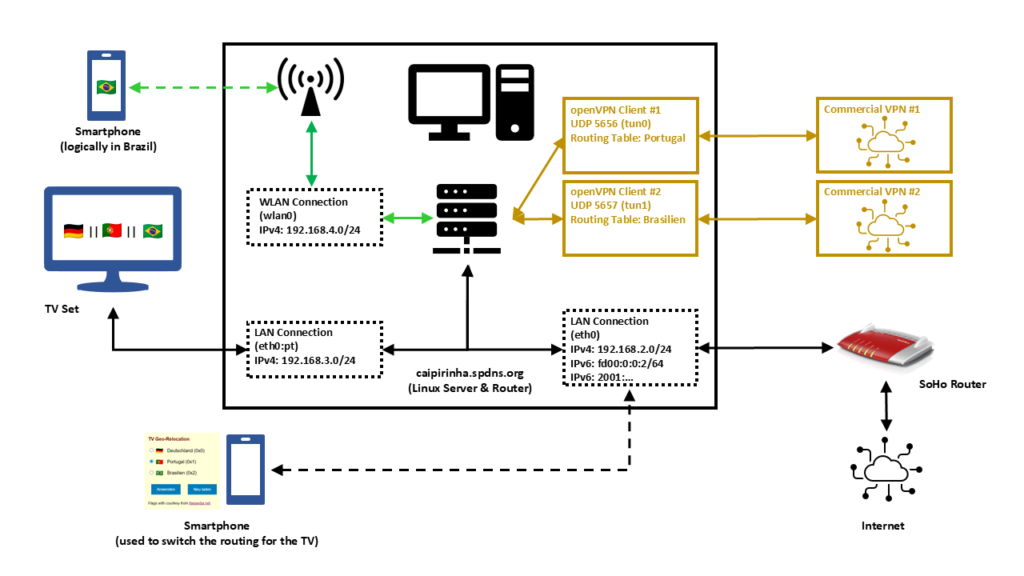
In this setup, we have a full-blown SoHo Linux server on an internal network 192.168.2.0/24 that is also used by all other devices in the same home. Subsequently, we will connect this Linux server via a commercial VPN to two endpoints, one endpoint in Portugal and one endpoint in Brazil. We will also create two additional networks for our SoHo environment:
- 192.168.4.0/24 will be spread via WLAN (WiFi) and will constantly logically be “in Brazil”. This network can simply be selected by a smartphone at home, and the smartphone will have a Brazilian internet connection while still being able to access all resources in the home network.
- 192.168.3.0/24 will an overlay on our wired SoHo network. The TV set will be the only client in this network. We will make the endpoint of this network selectable, that is, one shall be able to select whether this network is in Germany, in Portugal, or in Brazil.
That setup is suited to my personal preferences, but of course, after having read through this article, you will know sufficiently to suit the setup to your preferences and demands.
OpenVPN Client Configuration
For the setup described below, we need two client VPN connections, to Portugal and to Brazil. As I do not have infrastructure outside of Germany, I use a commercial VPN provider, in my case this is Private Internet Access®. However, there are several commercial VPNs that you can also use; the important thing is that they allow several active connections from one device and that you can configure and adapt the VPN configuration file, preferably for an openvpn connection (as this will also be described here). The client configuration files listed here use UDP, a split-tunnel setup and also contain all the necessary certificates in one file. The login credentials are stored in another file named /etc/openvpn/pia.login. The certificates of the configuration files have been omitted here for readability reasons. An important configuration command is route-nopull as it inhibits that we pull (default) routes from the commercial VPN server. After all, we want to specify ourselves which IP packets shall use which outgoing network.
UDP-based split VPN to Portugal
# Konfigurationsdatei für den openVPN-Client auf CAIPIRINHA zur Verbindung nach Portugal mit PIA

auth-user-pass       /etc/openvpn/pia.login
auth-nocache
auth-retry           nointeract
auth                 sha1
client
compress
dev                  tun0
disable-occ
log                  /var/log/openvpn_PT.log
lport                5457
mute                 20
proto                udp
persist-key
persist-tun
remote               pt.privacy.network 1198
remote-cert-tls      server
reneg-sec            0
resolv-retry         infinite
route-nopull
script-security      2
status               /var/run/openvpn/status_PT
tls-client
up                   /etc/openvpn/start_piavpn.sh
down                 /etc/openvpn/stop_piavpn.sh
verb                 3

<crl-verify>
-----BEGIN X509 CRL-----
...
-----END X509 CRL-----
</crl-verify>

<ca>
-----BEGIN CERTIFICATE-----
...
-----END CERTIFICATE-----
</ca>
UDP-based split VPN to Brazil
# Konfigurationsdatei für den openVPN-Client auf CAIPIRINHA zur Verbindung nach Brasilien mit PIA

auth-user-pass       /etc/openvpn/pia.login
auth-nocache
auth-retry           nointeract
auth                 sha1
client
compress
dev                  tun1
disable-occ
log                  /var/log/openvpn_BR.log
lport                5458
mute                 20
proto                udp
persist-key
persist-tun
remote               br.privacy.network 1198
remote-cert-tls      server
reneg-sec            0
resolv-retry         infinite
route-nopull
script-security      2
status               /var/run/openvpn/status_BR
tls-client
up                   /etc/openvpn/start_piavpn.sh
down                 /etc/openvpn/stop_piavpn.sh
verb                 3

<crl-verify>
-----BEGIN X509 CRL-----
...
-----END X509 CRL-----
</crl-verify>

<ca>
-----BEGIN CERTIFICATE-----
...
-----END CERTIFICATE-----
</ca>
Both configuration files call upon scripts (/etc/openvpn/start_piavpn.sh and /etc/openvpn/stop_piavpn.sh) which are executed upon start and upon termination of the VPN. start_piavpn.sh (which needs the tool ipcalc to be installed on the server) populates the routing table Portugal or Brasilien, depending on which client configuration has called the script. It furthermore blocks incoming new connections from the commercial VPNs for security reasons. Normally, you should not experience incoming connections on your commercial VPN (unless this has been wanted and ordered by you), however, I have seen different behavior in the past. Finally, the script start_piavpn.sh sets the correct default route in the corresponding routing table. The script stop_piavpn.sh deletes the blocking of incoming requests. There is no need to delete the previously active default routes from the routing tables Portugal or Brasilien as they will vanish anyway with the termination of the VPN connection. All other configuration options have been discussed in detail already in [1], [2].
start_piavpn.sh
#!/bin/bash
#
# This script sets the VPN parameters in the routing tables "main", "Portugal", and "Brasilien" once the connection has been successfully established.
# This script requires the tool "ipcalc" which needs to be installed on the target system.

# Set the correct PATH environment
PATH='/sbin:/usr/sbin:/bin:/usr/bin'

VPN_DEV=$1
VPN_SRC=$4
VPN_MSK=$5

VPN_GW=$(ipcalc ${VPN_SRC}/${VPN_MSK} | sed -n 's/^HostMin:\s*\([0-9]\{1,3\}\.[0-9]\{1,3\}\.[0-9]\{1,3\}\.[0-9]\{1,3\}\).*/\1/p')
VPN_NET=$(ipcalc ${VPN_SRC}/${VPN_MSK} | sed -n 's/^Network:\s*\([0-9]\{1,3\}\.[0-9]\{1,3\}\.[0-9]\{1,3\}\.[0-9]\{1,3\}\/[0-9]\{1,2\}\).*/\1/p')

case "${VPN_DEV}" in
  "tun0") ROUTING_TABLE='Portugal';;
  "tun1") ROUTING_TABLE='Brasilien';;
esac

iptables -t filter -A INPUT   -i ${VPN_DEV} -m state --state NEW,INVALID -j DROP
iptables -t filter -A FORWARD -i ${VPN_DEV} -m state --state NEW,INVALID -j DROP

ip route add ${VPN_NET} dev ${VPN_DEV} proto static scope link src ${VPN_SRC} table ${ROUTING_TABLE}
ip route replace default dev ${VPN_DEV} via ${VPN_GW} table ${ROUTING_TABLE}
stop_piavpn.sh
#!/bin/bash
#
# This script removes some routing table entries when the connection is terminated.

# Set the correct PATH environment
PATH='/sbin:/usr/sbin:/bin:/usr/bin'

VPN_DEV=$1
VPN_SRC=$4
VPN_MSK=$5

iptables -t filter -D INPUT   -i ${VPN_DEV} -m state --state NEW,INVALID -j DROP
iptables -t filter -D FORWARD -i ${VPN_DEV} -m state --state NEW,INVALID -j DROP
Routing Tables
In order to use Policy Routing, we set up routing tables as described in [1], and we describe these routing tables in /etc/iproute2/rt_tables:
#
# reserved values
#
255 local
254 main
253 default
0 unspec
#
# local
#

240 Portugal
241 Brasilien
The idea here is to direct all IP traffic that shall go to Portugal to the routing table Portugal, and to direct all IP traffic that shall go to Brazil to the routing table Brasilien. The routing table main will be used for all other traffic; it is part of the default configuration of /etc/iproute2/rt_tables.
Local LAN for the TV set
The network that so far has been used on my Linux server has been 192.168.2.0/24, and the corresponding server interface has been eth0. We now need to add one more network to this interface. In order to make that addition permanent and my life easy, I did that via the graphical YaST2 interface.
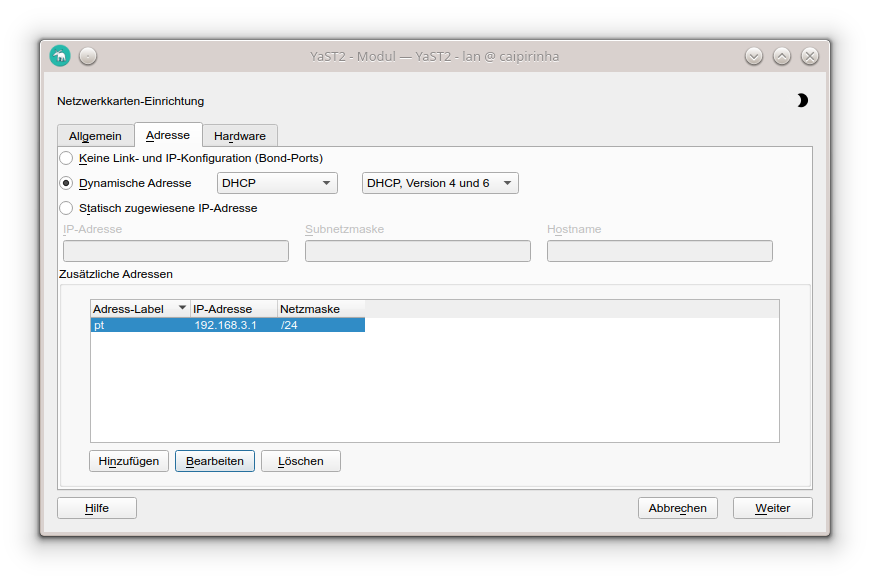
In my case, I chose the address label “pt” (because the original idea was to use this network exclusively for the traffic to Portugal); however, you can choose any label that you wish. While the Linux server usually receives a pseudo-static IP address (192.168.2.3) in the SoHo network 192.168.2.0/24 by the SoHo router (a FRITZ!Box), in our new network 192.168.3.0/24, the server gets the static IP address (192.168.3.1). Clients in this network will consequently require a static IP address configuration; we cannot use DHCP as this network runs on the same physical network infrastructure as the SoHo network 192.168.2.0/24 which already has the FRITZ!Box as DHCP master. In my case, I therefore have configured the TV set (the only client in the network 192.168.3.0/24) with the setup:
- IP address: 192.168.3.186
- Netmask: 255.255.255.0
- Gateway: 192.168.3.1
- DNS server: 192.168.3.1
As DNS I have used the server itself as I have a DNS relay running on the Linux server. If that was not the case, I could also have used 192.168.2.1 which is the address of the FRITZ!Box.
Local WLAN (WiFi) for wireless devices
For the WLAN (WiFi) network I have equipped the Linux server with a PCI Express WLAN card (in my case an old Asus PCE-N10, but I would recommend you a newer one in the 5 GHz band) and attached an external antenna to it. This WiFi card shall act as access point (master). I did not succeed to make that work with YaST2 in conjunction with WPA encryption, and subsequent to my failure, I consulted an Artificial Intelligence (AI) that recommended me to use the package hostapd which needs to be installed on the Linux server. I did so, and after some research and experiments, I came up with a suitable configuration:
/etc/hostapd.conf
# Basis-Einstellungen
interface=wlan0
driver=nl80211
ssid=Querstrasse 8 [BR]
hw_mode=g
channel=1                        # 1-13, vermeiden Sie DFS-Kanäle (52+)
ieee80211n=0                     # Optional für bessere Phones, aber ungünstig bei schlechter Verbindung

# WPA2-PSK (wpa=2 für WPA2 only, TKIP/CCMP für Kompatibilität)
wpa=2
wpa_passphrase=my_secret_password
wpa_key_mgmt=WPA-PSK WPA-PSK-SHA256
wpa_pairwise=TKIP CCMP
rsn_pairwise=CCMP

# Sonstiges
macaddr_acl=0                    # MAC address -based authentication nicht aktivieren
auth_algs=1                      # Open System Authentication
ignore_broadcast_ssid=0          # SSID frei sichtbar
wmm_enabled=0                    # WMM deaktiviert wegen schlechter Verbindung
beacon_int=75                    # Häufigere Beacons wegen schlechter Verbindung
max_num_sta=10                   # Max Clients
country_code=DE
country3=0x49                    # Indoor environment
ieee80211d=1                     # Advertise country-specific parameters
access_network_type=0            # Private network
internet=1                       # Network provides connectivity to the Internet
venue_group=7                    # 7,1 means Private Residence
venue_type=1
ipaddr_type_availability=10      # Double NATed private IPv4 address
logger_syslog=-1
logger_syslog_level=3            # Notifications only
logger_stdout=-1
logger_stdout_level=2
A couple of points in this configuration are important and shall be briefly discussed:
- The network is quite weak in some parts of my house, and so some parameters have been configured for bad network conditions. If you do not have this issue and see a strong WiFi signal all over your place, you might want to change some of the parameters or not set them to dedicated values at all. Consult the original hostapd.conf file for an explanation of all parameters or ask the AI for a suitable setup.
- my_secret_password has to be replaced with the password that you intend to secure your WiFi with, of course.
- I configured the card for Germany, and hence power output is limited to 100 mW, according to the local regulations. A configuration for the USA would allow a higher power output, but this is illegal in Europe. Furthermore, that would only bring a real benefit if your client devices also had higher output power.
- I chose the SSID Querstrasse 8 [BR] (Yes, with white space in the SSID!). If you have old clients, you might want to avoid white spaces in the SSID name.
- I set the values for venue_group, venue_type and access_network_type in order to indicate to prospective clients that this is a private (non-public) network. You might also leave these configuration options away, there would be no real impact.
In order to bring the interface wlan0 to life, we need to issue these three commands:
ip addr add 192.168.4.1/24 dev wlan0
ip link set wlan0 up
systemctl start hostapd.service
However, before we can connect new clients to this WiFi, we need to set up a DHCP server on this network. The small DHCP and DNS caching server dnsmasq is the right tool to be used here.
Providing DHCP and DNS on wlan0
dnsmasq can provide both DHCP as well as cache DNS. That is very practical as it allows us for example, to have only DNS on eth0 where the FRITZ!Box already is the DHCP master, but to configure both DHCP and a caching DNS on wlan0. The following configuration file will exactly do that (it uses only a subset of the capabilities of dnsmasq):
/etc/dnsmasq.conf
# Never forward addresses in the non-routed address spaces.
bogus-priv

# If you don't want dnsmasq to read /etc/resolv.conf or any other
# file, getting its servers from this file instead (see below), then
# uncomment this.
no-resolv

# If you don't want dnsmasq to poll /etc/resolv.conf or other resolv
# files for changes and re-read them then uncomment this.
no-poll

# Add other name servers here, with domain specs if they are for
# non-public domains.
server=8.8.8.8
server=8.8.4.4
server=9.9.9.9
server=1.1.1.1

# If you want dnsmasq to listen for DHCP and DNS requests only on
# specified interfaces (and the loopback) give the name of the
# interface (eg eth0) here.
# Repeat the line for more than one interface.
interface=eth0
interface=wlan0

# If you want dnsmasq to provide only DNS service on an interface,
# configure it as shown above, and then use the following line to
# disable DHCP and TFTP on it.
no-dhcp-interface=eth0

# Uncomment this to enable the integrated DHCP server, you need
# to supply the range of addresses available for lease and optionally
# a lease time. If you have more than one network, you will need to
# repeat this for each network on which you want to supply DHCP
# service.
dhcp-range=tag:wlan0,192.168.4.10,192.168.4.254,24h

# Set the NTP time server addresses
dhcp-option=option:ntp-server,192.168.2.3

# Send Microsoft-specific option to tell windows to release the DHCP lease
# when it shuts down. Note the "i" flag, to tell dnsmasq to send the
# value as a four-byte integer - that's what Microsoft wants. See
# https://learn.microsoft.com/en-us/openspecs/windows_protocols/ms-dhcpe/4cde5ceb-4fc1-4f9a-82e9-13f6b38d930c
dhcp-option=vendor:MSFT,2,1i

# Include all files in a directory which end in .conf
conf-dir=/etc/dnsmasq.d/,*.conf
In this configuration, we can see that on eth0, we will not enable DHCP (Option no-dhcp-interface=eth0). As this option is missing for wlan0, we will have DHCP active on wlan0. Furthermore, we propagate the server’s address 192.168.2.3 as NTP server. For this, the NTP service needs to be enabled, of course, otherwise that would be pointless.
While address 192.168.2.3 is not in the network of wlan0 (192.168.4.0/24), we will enable access to that network in the subsequent chapter.
dnsmasq uses the file /etc/hosts as well as upstream DNS servers for its own DNS service. The advantage of this is that – if your file /etc/hosts is maintained – you can also use the device names listed there. As pstream DNS servers from which dnsmasq gets the IP resolution, I have configured four popular ones (8.8.8.8, 8.8.4.4, 9.9.9.9, 1.1.1.1), but you could also just list the IP of your SoHo router or DNS resolver of your internet provider.
Setting the Routing Policy
Now, we must ensure that traffic from our new networks 192.168.3.0/24 and 192.168.4.0/24 can flow as intended. We have to set up the correct routing policy, and for that, we need the following commands whereby the first three commands have already been mentioned (and been executed) in one of the chapters above:
# Start interfaces wlan0
ip addr add 192.168.4.1/24 dev wlan0
ip link set wlan0 up
systemctl start hostapd.service

# Setup the NAT table for the VPNs.
iptables -t nat -F
iptables -t nat -A POSTROUTING -s 192.168.3.0/24 -o eth0 -j SNAT --to-source 192.168.2.3
iptables -t nat -A POSTROUTING -s 192.168.4.0/24 -o eth0 -j SNAT --to-source 192.168.2.3
iptables -t nat -A POSTROUTING                   -o tun0 -j MASQUERADE
iptables -t nat -A POSTROUTING                   -o tun1 -j MASQUERADE


# Add the missing routes in the other routing tables
for TABLE in Portugal Brasilien; do
    ip route add 192.168.2.0/24 dev eth0  proto kernel scope link src 192.168.2.3 table ${TABLE}
    ip route add 192.168.3.0/24 dev eth0  proto kernel scope link src 192.168.3.1 table ${TABLE}
    ip route add 192.168.4.0/24 dev wlan0 proto kernel scope link src 192.168.4.1 table ${TABLE}
done

# Setup the MANGLE tables which shape and mark the traffic that shall use other routing tables
iptables -t mangle -F
iptables -t mangle -A PREROUTING                            -j CONNMARK --restore-mark
iptables -t mangle -A PREROUTING -m mark  ! --mark 0        -j ACCEPT
iptables -t mangle -A PREROUTING -i eth0  -s 192.168.3.0/24 -j MARK --set-mark 1
iptables -t mangle -A PREROUTING -i wlan0 -s 192.168.4.0/24 -j MARK --set-mark 2
iptables -t mangle -A PREROUTING                            -j CONNMARK --save-mark
iptables -t mangle -A OUTPUT                                -j CONNMARK --restore-mark
iptables -t mangle -A OUTPUT     -m mark  ! --mark 0        -j ACCEPT
iptables -t mangle -A OUTPUT                                -j CONNMARK --save-mark

# Add rules for the traffic that shall branch to the new routing table
ip rule add from all fwmark 0x1 priority 5000 lookup Portugal
ip rule add from all fwmark 0x2 priority 5000 lookup Brasilien
Personally, I have these commands executed as part of a shell script that runs after powering up the Linux server and that I also use to control many other services and configurations.
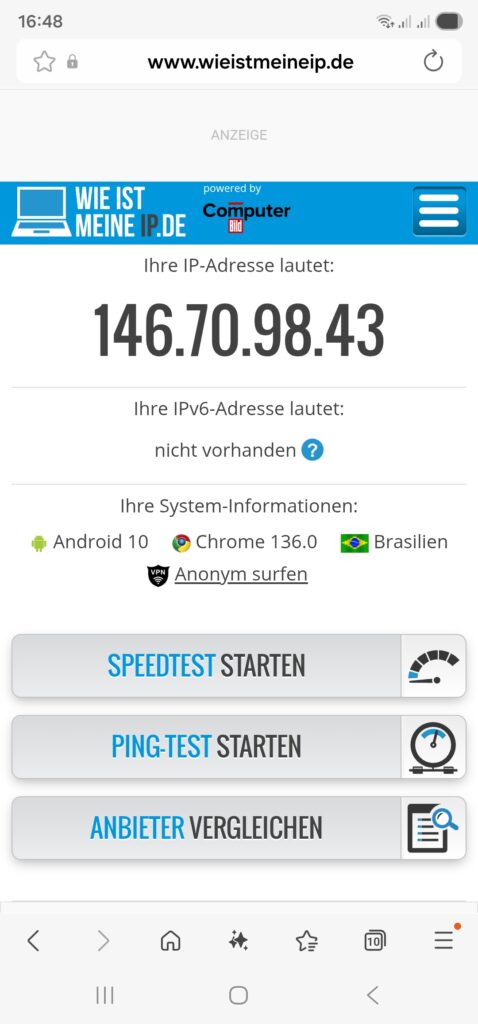
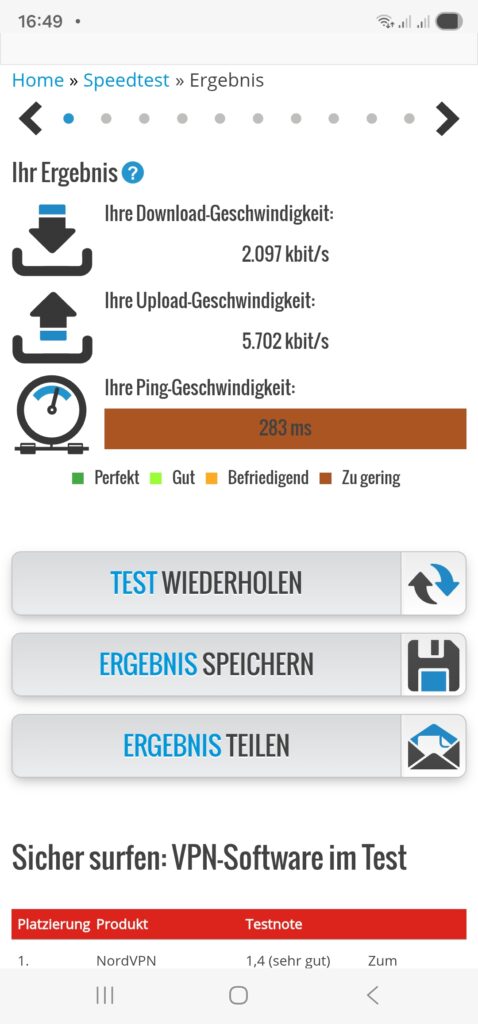
Once we have started the dnsmasq service (systemctl start dnsmasq.service) from the previous chapter and set up the routing policy correctly, we should be able to connect with a smartphone or a notebook to our new WiFi network 192.168.4.0/24 and do first tests like shown here:
Relocating the TV Set to DE, PT, BR
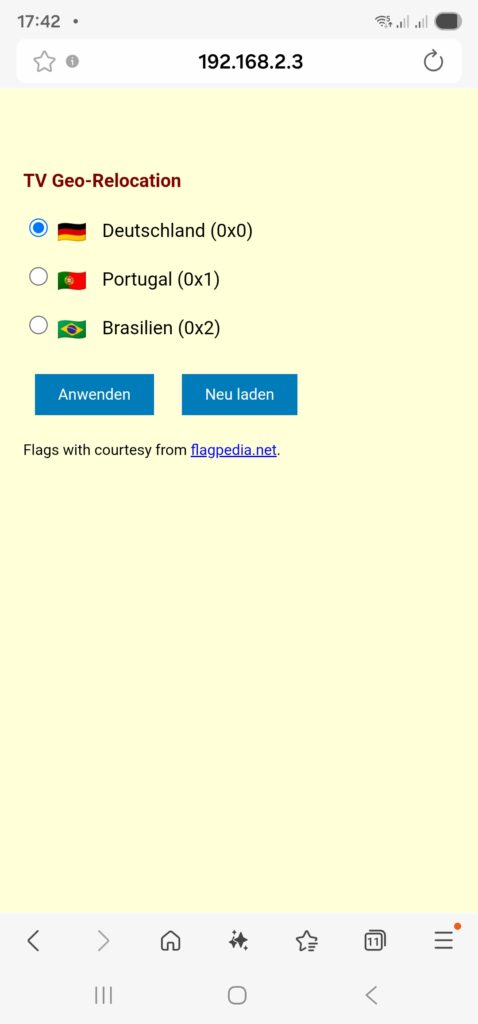
As a means of convenience, we want to set up a small web page that can be accessed on our smartphone so that we can “re-locate” the TV set between the countries Germany, Portugal, and Brazil. This simple “no frills” page will serve our purpose:
relocate.php:
<!DOCTYPE HTML PUBLIC "-//W3C//DTD HTML 4.0 Transitional//EN">
<html>
<head>
  <title>TV Geo-Relocation</title>
  <style type="text/css">
    a:link { text-decoration:underline; font-weight:normal; color:#0000FF; }
    a:visited { text-decoration:underline; font-weight:normal; color:#800080; }
    a:hover { text-decoration:underline; font-weight:normal; color:#909090; }
    a:active { text-decoration:blink; font-weight:normal; color:#008080; }
    h1 { font-family:Arial,Helvetica,sans-serif; font-size:100%; color:maroon; text-indent:0.0cm; }
    hr { text-indent:0.0cm; height:3px; width:100%; text-align:left; }
    p { font-family:Arial,Helvetica,sans-serif; font-size:80%; color: black; text-indent:0.0cm; }
    body { font-family: Arial, sans-serif; background-color:#FFFFD8; max-width: 600px; margin: 50px auto; padding: 20px; }
    .flag { width: 24px; height: 16px; vertical-align: middle; margin-right: 10px; }
    .radio-group { margin: 20px 0; }
    input[type="radio"] { margin-right: 5px; }
    button { padding: 10px 20px; margin: 10px; background: #007cba; color: white; border: none; cursor: pointer; }
  </style>
  <meta name="viewport" content="width=device-width, initial-scale=1.0">
  <meta http-equiv="content-language" content="de">
  <meta http-equiv="cache control" content="no-cache">
  <meta http-equiv="pragma" content="no-cache">
  <meta name="author" content="Gabriel Rüeck">
  <meta name="date" content="2026-02-17T18:00:00+01:00">
  <meta name="robots" content="noindex">
</head>

<body bgcolor="seashell">
  <?php
    // Setze die neue Markierung für Pakete aus 192.168.3.0/24
    if ($_SERVER['REQUEST_METHOD'] === 'POST') {
      $fwmark = $_POST['fwmark'] ?? '';
      if (in_array($fwmark, ['0','1','2'], true)) {
        shell_exec('sudo /srv/www/htdocs/tv/write_status.sh ' . escapeshellarg($fwmark));
      }
    }

    // Hole aktuelle Markierung für Pakete aus 192.168.3.0/24
    $current_mark = trim(shell_exec('sudo /srv/www/htdocs/tv/read_status.sh'));
  ?>
  <h1>TV Geo-Relocation</h1>

  <form method="POST">
    <div class="radio-group">
      <label>
        <input type="radio" name="fwmark" value="0" <?= $current_mark === '0x0' ? 'checked' : '' ?>>
        <img src="https://flagcdn.com/24x18/de.png" srcset="https://flagcdn.com/48x36/de.png 2x" class="flag" alt="🇩🇪"> Deutschland (0x0)
      </label><br><br>

      <label>
        <input type="radio" name="fwmark" value="1" <?= $current_mark === '0x1' ? 'checked' : '' ?>>
        <img src="https://flagcdn.com/24x18/pt.png" srcset="https://flagcdn.com/48x36/pt.png 2x" class="flag" alt="🇵🇹"> Portugal (0x1)
      </label><br><br>

      <label>
        <input type="radio" name="fwmark" value="2" <?= $current_mark === '0x2' ? 'checked' : '' ?>>
        <img src="https://flagcdn.com/24x18/br.png" srcset="https://flagcdn.com/48x36/br.png 2x" class="flag" alt="🇧🇷"> Brasilien (0x2)
      </label>
    </div>

    <button type="submit">Anwenden</button>
    <button type="button" onclick="location.reload()">Neu laden</button>

    <p>Flags with courtesy from <a href="https://flagpedia.net" target="_blank">flagpedia.net</a>.</p>
  </form>

</body>
</html>
This PHP page needs to be put in a suitable directory, and you need to have web server up and running, of course (not described in this article). In my case, the file is located in /srv/www/htdocs/tv/relocate.php. In the header of the PHP file, you can see the line:
<meta name="viewport" content="width=device-width, initial-scale=1.0">This line adapts the width of the page when being called on a smartphone so that it appears with a reasonable scaling on the smartphone screen. Furthermore, as you can see, this web page calls two shell scripts, and those are:
read_status.sh
#! /bin/bash
#
# This script will be executed as root by the PHP scipt relocate.php
#
# Gabriel Rüeck 15.02.2026
#

/usr/sbin/iptables -t mangle --line-numbers -L PREROUTING -n -v | fgrep "eth0" | sed -r 's/^.*MARK (set|and) (0x[[:xdigit:]]+)/\2/'
write_status.sh
#! /bin/bash
#
# This script will be executed as root by the PHP scipt relocate.php
#
# Gabriel Rüeck 15.02.2026
#

LINE_NUMBER=$(/usr/sbin/iptables -t mangle --line-numbers -L PREROUTING -n -v | fgrep "eth0" | sed 's/^\([[:digit:]]\+\) \+.*/\1/')
MARK=${1}
/usr/sbin/iptables -t mangle -R PREROUTING ${LINE_NUMBER} -i eth0 -s 192.168.3.0/24 -j MARK --set-mark ${MARK}
read_status.sh reads the corresponding routing entry from the mangle table [6], and this information enables the page relocate.php to display the correct country to which the traffic of the TV set if channeled when relocate.php is called initially. write_status.sh is used to modify the correct entry in the mangle table and channel the traffic to the country select on the PHP page. Both read_status.sh as well as write_status.sh need to be executed as root, and therefore, they need to be listed in the sudoers file structure. [7], [8] explain the correct proceeding. In our case, the file /etc/sudoers.d/wwwrun has been set up with the access rights 0440, and this file should have the content:
wwwrun ALL=(root) NOPASSWD: /srv/www/htdocs/tv/read_status.sh
wwwrun ALL=(root) NOPASSWD: /srv/www/htdocs/tv/write_status.sh
Of course, we do not want arbitrary internet users to change the geo-location of the TV set, and therefore, the access to the PHP page relocate.php must be restricted. An easy, but not entirely secure method is to limit access to this page to the local networks. This can be done in the webserver configuration file (in my case: /etc/apache2/httpd.conf.local) where we add:
# TV Configuration
<Directory /srv/www/htdocs/tv>
  Require local
  Require ip 192.168.0.0/16 127.0.0.0/8 ::1/128 fd00:0:0::/48
</Directory>
This will restrict access to local networks. But this is entirely fool-proof against advanced hacking attacks (see [9] as an example).
The PHP page should ultimately look like this on a smartphone:
Shortcomings
During experiments with this setup, I have come across the following shortcoming:
- On my TV set, a Samsung GQ75Q80, I was able to configure a static IPv4 address. However, it seemed to me that the TV was still getting a dynamic IPv6 address from the FRITZ!Box. I suppose that if one really wants to isolate the TV set from the SoHo network, it would be necessary to use a separate physical network. Luckily, this did not impact the possibility to watch TV with the Portuguese TV app.
Conclusion
With Policy Routing and commercial VPN connections, it is possible to create additional networks in a SoHo environment that will allow client devices to behave as if they were in another country. Basically, you could also achieve that with a VPN connection on the device (smartphone, etc.) itself; however, you then might have access to other services in your SoHo network (printer, etc.). And in the case of a TV set, I am not even sure if there are models that can build up VPN connections themselves. However, the setup described here also shows that it is not trivial as several services need to be configured and act together in a meaningful way.
Sources
- [1] = Setting up Client VPNs, Policy Routing
- [2] = Setting up Dual Stack VPNs
- [3] = iptables – Port forwarding over OpenVpn
- [4] = Routing for multiple uplinks/providers
- [5] = Two Default Gateways on One System
- [6] = Netfilter
- [7] = Classic SysAdmin: Configuring the Linux Sudoers File
- [8] = How To Edit the Sudoers File Safely
- [9] = Forcepoint Research Report: Attacking the internal network from the public Internet using a browser as a proxy