Setting up Dual Stack VPNs
Executive Summary
This blog post explains how I set up dual stack (IPv4, IPv6) virtual private networks (VPN) with the open-source packages openvpn and WireGuard on my Linux server caipirinha.spdns.org. Clients (smartphones, tablets, notebooks) which connect to my server will be supplied with a dual stack VPN connection and can therefore use both IPv4 as well as IPv6 via the Linux server to the internet.
Background
The implementation was originally intended to help a friend who lived in China and who struggled with his commercial VPN that only tunneled IPv4 and did not block IPv6. He often experienced blockages when he tried to access social media sites as his system would prefer IPv6 over IPv4 and so the connection would not run through his VPN. However, due to [6], openvpn alone is no longer suited to circumvent censorship in China [7]. WireGuard might still work in geographies where openvpn is blocked, however.
Preconditions
In order to use the approach described here, you should:
- … have a full dual stack internet connection (IPv4, IPv6)
- … have access to a Linux machine which is already properly configured for dual stack on its principal network interface (e.g., eth0)
- … have the Linux machine set up as a router
- … have the package openvpn and/or WireGuard installed (preferably from a repository of your Linux distribution)
- … know how to create client and server certificates for openvpn [11] and/or WireGuard [12], [13], [19] although this blog post will also contain a short description on how to create a set of certificates and keys for openvpn
- … have knowledge of routing concepts, networks, some understanding of shell scripts and configuration files
- … know related system commands like sysctl
Description and Usage
The graph below shows the setup on my machine caipirinha.spdns.org with 5 VPN services (blue, green color) that will be described in this blog post. The machine has also 3 VPN clients configured which are mapped to a commercial service (ocker color), but this will not be topic of this blog post.
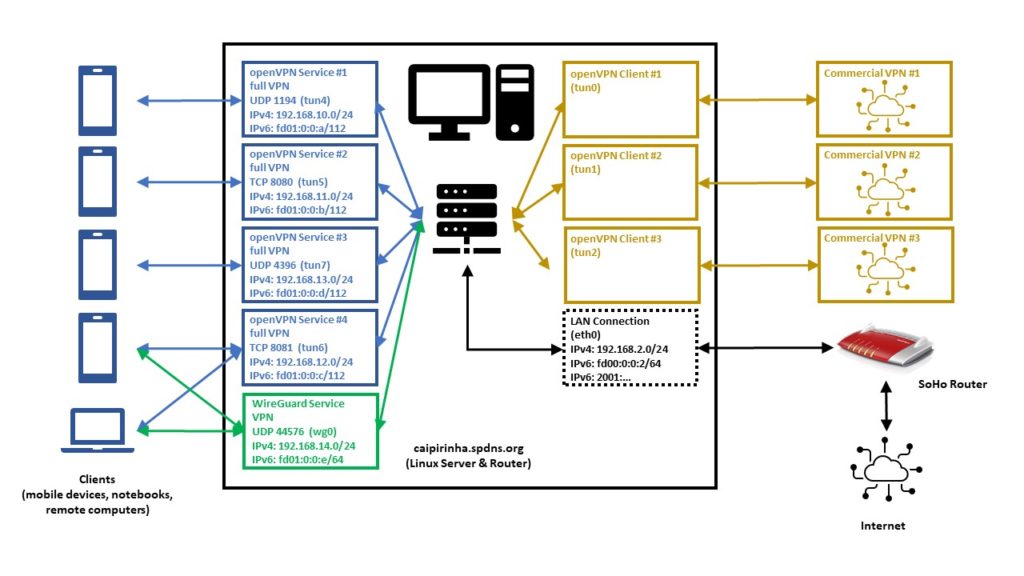
Home Network Setup
Let us now look at some details of the network setup:
- The Linux server is not connected to the internet directly, but it is connected to a small SoHo router which acts as basic firewall and forwards a selection of ports and protocols to the Linux server.
- The internal IPv4 network which is setup by the SoHo router is 192.168.2.0/24.
- The internal IPv6 network which is setup by the SoHo router is fd00:0:0:2/64; this is configured in the respective menu of the SoHo router as shown below and is within the IPv6 unique local address space [1], [2]. I decided to use an IPv6 with a “2” in the network address like the “2” in the IPv4 network.
- The Linux server also gets a public IPv6 address allocated (like all other devices in my home network); this is accomplished by the SoHo router that has IPv6 enabled.

When everything has been set up correctly, the Linux server should get various IP addresses, and among them various IPv6 addresses:
- a “real” and routable one starting with numbers in the range from “2000:” until “3fff:”.
- a SLAAC [3] one starting with “fe80:”
- a “private” one starting with “fd00::2:”
An example is shown here:
caipirinha:~ # ifconfig eth0
eth0: flags=4163 mtu 1500
inet 192.168.2.3 netmask 255.255.255.0 broadcast 192.168.2.255
inet6 2001:16b8:306c:c700:76d4:35ff:fe5c:d2c3 prefixlen 64 scopeid 0x0
inet6 fe80::76d4:35ff:fe5c:d2c3 prefixlen 64 scopeid 0x20
inet6 fd00::2:76d4:35ff:fe5c:d2c3 prefixlen 64 scopeid 0x0
...
Enabling Routing
Routing for IPv4 and IPv6 needs to be enabled on the Linux server. I personally also decided to switch off the privacy extensions on the Linux server, but that is a personal matter of taste:
# Enable "loose" reverse path filtering and prohibit icmp redirects
sysctl -w net.ipv4.conf.all.rp_filter=2
sysctl -w net.ipv4.conf.all.send_redirects=0
sysctl -w net.ipv4.conf.eth0.send_redirects=0
sysctl -w net.ipv4.icmp_errors_use_inbound_ifaddr=1

# Enable IPv6 routing, but keep SLAAC for eth0
sysctl -w net.ipv6.conf.eth0.accept_ra=2
sysctl -w net.ipv6.conf.all.forwarding=1

# Switch off the privacy extensions
sysctl -w net.ipv6.conf.eth0.use_tempaddr=0
OpenVPN Key Management with Easy-RSA
For the openVPN server and clients, we need a certification authority and we ultimately need to create signed certificates and keys. This can be done with the help of the package easy-rsa that is available for various platforms [22] and often is part of Linux distributions, too. Documentation and hands-on examples are given in [20] and [21].
We start with the initialization of a Public Key Infrastructure (PKI) and the creation of a Certificate Authority (CA) followed by the creation of a Certificate Revocation List (CRL)
easyrsa init-pki
easyrsa build-ca nopass
easyrsa gen-crl
The next step is the creation of a key pair for the server. The public key will be signed by the CA and thus become our server certificate. Furthermore, we create Diffie-Hellman parameters for the server (not needed if you create elliptic keys). All this can be done by:
easyrsa --days=3652 build-server-full caipirinha.spdns.org nopass
easyrsa gen-dh
In this example, the server certificate is valid for some 3652 days (10 years), the certificate is named caipirinha.spdns.org.crt, and the private key which must remain on the server is named caipirinha.spdns.org.key.
Now, we can create client certificates in a similar way. In the example, the client certificates will have a validity of 5 years only:
easyrsa --days=1825 build-client-full gabriel-SM-G991B nopass
easyrsa --days=1825 build-client-full gabriel-SM-N960F nopass
easyrsa --days=1825 build-client-full gabriel-SM-N915FY nopass
easyrsa --days=1825 build-client-full gabriel-SM-T580 nopass
...
I chose not to use passwords for the private key in order to facilitate the handling. Furthermore, I went for the easy way and created all certificates and keys on one system only. If you intend to deploy a professional solution, you have to keep cyber-security in mind and you may therefore want to exercise more caution and separate the certificate authority on a secured system from the creation of server and client key pairs as it has been advised in [20].
OpenVPN Server Configuration
Before we go into details of the configuration, we must distinguish 3 concepts of VPNs:
- A (full) tunneling VPN tunnels all connections through the VPN, once the VPN connection has been established. This offers possibilities, but also has implications:
- The VPN client appears to be in the geographic location of the VPN server unless the server itself tunnels through more nodes. This can be useful to circumvent censorship in the geography where the VPN client is located as all connections from the client to services in the internet are channeled through the VPN server.
- In a complex multi-level server setup, it can make the client appear in different countries, depending on which destination the client is trying to access. A VPN client might, for example, be in Angola, but connect to a VPN server in Germany which itself has VPN connections to Brazil and to Portugal. If the VPN server is configured accordingly, the VPN client in Angola may appear as being in Portugal when accessing Portuguese web sites and might appear as being located in Brazil when accessing Brazilian web sites and might appear as being located in Germany for everything else.
- The VPN server can implement filtering services like filtering out ad servers or doing virus scans of downloads.
- The VPN server can implement access restrictions; companies use this sometimes to disallow clients to access web sites which they deem to be related to “sex, hate, crime, gambling, …”.
- A split tunneling VPN tunnels only connections to certain networks between the VPN client and the VPN server while all other connections from the VPN client access the internet through the local provider. The typical usage scenario is not related to censorship, but to dedicated resources to which the VPN server grants access (e.g., network shares aka “samba”, proxy services, etc.) that shall be accessed from the VPN client while the latter is not physically connected to the home or company network.
- An inverse split tunneling VPN tunnels almost all connections, with a few exceptions. This concept is often used in companies which want basically all connections to run through their infrastructure so that they can execute virus scans and access restrictions, but which have (correctly) realized that bandwidth-intensive operations like cloud access, access to video conferencing services, etc. should be taken off the VPN tunnel as their performance is deteriorated otherwise.
The following configurations will create 4 different VPNs based on 2 concepts above.
- UDP-based VPN, full tunneling: This is the preferred VPN when all connections shall be tunneled.
- UDP-based VPN, split tunneling: This is the preferred VPN when you want to blend in resources from your home network.
- TCP-based VPN, full tunneling: TCP can be used when the connection quality to the VPN server is unstable or when UDP is blocked by some gateway in between.
- TCP-based VPN, split tunneling: This is the preferred VPN when you want to blend in resources from your home network, but when the connection quality to the VPN server is unstable or when UDP is blocked by some gateway in between.
UDP-based VPN, full tunneling
# Konfigurationsdatei für den openVPN-Server auf CAIPIRINHA (UDP:1194)

ca                    /root/pki/ca.crt
cert                  /etc/openvpn/caipirinha.spdns.org.crt
client-config-dir     /etc/openvpn/conf-1194
crl-verify            /root/pki/crl.pem
dev                   tun4
dh                    /root/pki/dh.pem
hand-window           90
ifconfig              192.168.10.1  255.255.255.0
ifconfig-pool         192.168.10.2  192.168.10.239  255.255.255.0
ifconfig-ipv6         fd01:0:0:a::1 fd00::2:3681:c4ff:fecb:5780
ifconfig-ipv6-pool    fd01:0:0:a::2/112
ifconfig-pool-persist /etc/openvpn/ip-pool-1194.txt
keepalive             20 80
key                   /etc/openvpn/caipirinha.spdns.org.key
log                   /var/log/openvpn-1194.log
mode                  server
persist-key
persist-tun
port                  1194
proto                 udp6
reneg-sec             86400
script-security       2
status                /var/run/openvpn/status-1194
tls-server
topology              subnet
up                    /etc/openvpn/start_vpn.sh
verb                  1
writepid              /var/run/openvpn/server-1194.pid

# Topologie des VPN und Default-Gateway
push "topology subnet"
push "route-gateway 192.168.10.1"
push "redirect-gateway def1 bypass-dhcp"
push "tun-ipv6"
push "route-ipv6 2000::/3"
# DNS-Server
push "dhcp-option DNS 8.8.8.8"
push "dhcp-option DNS 8.8.4.4"
UDP-based VPN, split tunneling
# Konfigurationsdatei für den openVPN-Server auf CAIPIRINHA (UDP:4396)

ca                    /root/pki/ca.crt
cert                  /etc/openvpn/caipirinha.spdns.org.crt
client-config-dir     /etc/openvpn/conf-4396
crl-verify            /root/pki/crl.pem
dev                   tun7
dh                    /root/pki/dh.pem
hand-window           90
ifconfig              192.168.13.1  255.255.255.0
ifconfig-pool         192.168.13.2  192.168.13.239  255.255.255.0
ifconfig-ipv6         fd01:0:0:d::1 fd00::2:3681:c4ff:fecb:5780
ifconfig-ipv6-pool    fd01:0:0:d::2/112
ifconfig-pool-persist /etc/openvpn/ip-pool-4396.txt
keepalive             20 80
key                   /etc/openvpn/caipirinha.spdns.org.key
log                   /var/log/openvpn-4396.log
mode                  server
persist-key
persist-tun
port                  4396
proto                 udp6
reneg-sec             86400
script-security       2
status                /var/run/openvpn/status-4396
tls-server
topology              subnet
up                    /etc/openvpn/start_vpn.sh
verb                  1
writepid              /var/run/openvpn/server-4396.pid

# Topologie des VPN und Default-Gateway
push "topology subnet"
push "route-gateway 192.168.13.1"
push "tun-ipv6"
push "route-ipv6 2000::/3"
# Routen zum internen Netzwerk setzen
push "route 192.168.2.0 255.255.255.0"
TCP-based VPN, full tunneling
# Konfigurationsdatei für den openVPN-Server auf CAIPIRINHA  (TCP:8080)

ca                    /root/pki/ca.crt
cert                  /etc/openvpn/caipirinha.spdns.org.crt
client-config-dir     /etc/openvpn/conf-8080
crl-verify            /root/pki/crl.pem
dev                   tun5
dh                    /root/pki/dh.pem
hand-window           90
ifconfig              192.168.11.1  255.255.255.0
ifconfig-pool         192.168.11.2  192.168.11.239  255.255.255.0
ifconfig-ipv6         fd01:0:0:b::1 fd00::2:3681:c4ff:fecb:5780
ifconfig-ipv6-pool    fd01:0:0:b::2/112
ifconfig-pool-persist /etc/openvpn/ip-pool-8080.txt
keepalive             20 80
key                   /etc/openvpn/caipirinha.spdns.org.key
log                   /var/log/openvpn-8080.log
mode                  server
persist-key
persist-tun
port                  8080
proto                 tcp6-server
reneg-sec             86400
script-security       2
status                /var/run/openvpn/status-8080
tls-server
topology              subnet
up                    /etc/openvpn/start_vpn.sh
verb                  1
writepid              /var/run/openvpn/server-8080.pid

# Topologie des VPN und Default-Gateway
push "topology subnet"
push "route-gateway 192.168.11.1"
push "redirect-gateway def1 bypass-dhcp"
push "tun-ipv6"
push "route-ipv6 2000::/3"
# DNS-Server
push "dhcp-option DNS 8.8.8.8"
push "dhcp-option DNS 8.8.4.4"
TCP-based VPN, split tunneling
# Konfigurationsdatei für den openVPN-Server auf CAIPIRINHA  (TCP:8081)

ca                    /root/pki/ca.crt
cert                  /etc/openvpn/caipirinha.spdns.org.crt
client-config-dir     /etc/openvpn/conf-8081
crl-verify            /root/pki/crl.pem
dev                   tun6
dh                    /root/pki/dh.pem
hand-window           90
ifconfig              192.168.12.1  255.255.255.0
ifconfig-pool         192.168.12.2  192.168.12.239  255.255.255.0
ifconfig-ipv6         fd01:0:0:c::1 fd00::2:3681:c4ff:fecb:5780
ifconfig-ipv6-pool    fd01:0:0:c::2/112
ifconfig-pool-persist /etc/openvpn/ip-pool-8081.txt
keepalive             20 80
key                   /etc/openvpn/caipirinha.spdns.org.key
log                   /var/log/openvpn-8081.log
mode                  server
persist-key
persist-tun
port                  8081
proto                 tcp6-server
reneg-sec             86400
script-security       2
status                /var/run/openvpn/status-8081
tls-server
topology              subnet
up                    /etc/openvpn/start_vpn.sh
verb                  1
writepid              /var/run/openvpn/server-8081.pid

# Topologie des VPN und Default-Gateway
push "topology subnet"
push "route-gateway 192.168.12.1"
push "tun-ipv6"
push "route-ipv6 fd00:0:0:2::/64"
# Routen zum internen Netzwerk setzen
push "route 192.168.2.0 255.255.255.0"
We shall now look at some configuration parameters and their meaning:
- cert, key: The location of the server certificate and the server key has to be listed.
- ca: The location of the certificate authority certificate has to be listed.
- crl-verify: This point to a certificate revocation list and contains the certificates that once were issued for devices that have been retired meanwhile or for users that only needed a temporary VPN access .
- dev: This determines the tun device that shall be used for the connection. I recommend using dedicated tun devices for all VPNs rather than having them randomly assigned during start-up.
- ifconfig, ifconfig-pool: This determines the IPv4 address of the server and the pool from which IPv4 addresses are granted to the clients. I decided to use a different /24 network for each VPN configuration, that is, the networks 192.168.10.0/24, 192.168.11.0/24, 192.168.12.0/24, and 192.168.13.0/24. However, I decided not to use the full IP address range for dynamic allocation as I have some VPN clients (smartphones, notebooks) which get a dedicated client address so that I can easily tweak settings on the Linux server for those clients. These clients have a small, dedicated configuration file in the folder named in client-config-dir. Such a dedicated configuration can be used to allocate the same IP address to a certain VPN client.
- ifconfig-ipv6: The first parameter is the IPv6 address of the server, and the second IPv6 address is the one of the router to the internet; in that case, I put the SoHo router there (fd00::2:3681:c4ff:fecb:5780), see the image Configuration of the internal IPv6 network.
- ifconfig-ipv6-pool: This is the pool of IPv6 addresses that are granted to the clients. I follow a similar approach as with the IPv4 networks and set up separate networks for each VPN, that is, the networks fd01:0:0:a::2/112, fd01:0:0:b::2/112, fd01:0:0:c::2/112 and fd01:0:0:d::2/112. Keep in mind that the first address of the IP address pool is the one mentioned here, e.g., fd01:0:0:a:0:0:0:2, as fd01:0:0:a:0:0:0:1 is already used for the server.
- keepalive: Sets the interval of ping-alive requests and its timeout. This is useful as gateways that are in between the VPN client and the VPN server might keep connections open and port allocations reserved only for some time; subsequently, they might be freed up. Ideally, you want to use the longest time periods possible as shorter periods create unnecessary traffic (and might eat up the data volume of mobile clients).
- port: While the standard port for openvpn is 1194, with more than one VPN you are better advised to use different, dedicated ports that are not used by other service on your server.
- proto: This determines the protocol used and is either udp6 or tcp6-server. The “6” in both arguments indicates that the service shall be provided both on the IPv4 as well as on the IPv6 address. Leaving the “6” away only provides the service on the IPv4 address.
- push “redirect-gateway def1 bypass-dhcp” tells the VPN client to bypass the VPN for DHCP queries. Otherwise, the client machine gets stuck when the DHCP lease on the client side terminates.
- push “route-ipv6 2000::/3” tells the VPN client machine to use the VPN for all IPv6 addresses that start with “2000::/3”, and those are currently all routable IPv6 addresses [2].
- push “dhcp-option DNS 8.8.8.8” and push “dhcp-option DNS 8.8.4.4” set Google‘s DNS servers for the VPN client machine and so gives us an excellent and fast service.
- reneg-sec: The specified 86400 seconds re-negotiate new encryption keys only once per day. For security reasons, a lower time period would be better, but some countries have put in efforts to detect and block encrypted communication, and this detection happens though the key exchange which seems to have a characteristic bit pattern [6]; therefore, a longer period has been set here.
OpenVPN Client Configuration
The generation of client configuration files is explained in [11], and there are numerous guidelines in the internet. Therefore, I just want to give 2 examples and briefly point out some useful considerations.
UDP-based VPN, full tunneling
# Konfigurationsdatei für den openVPN-Client auf ...

client
dev              tun
explicit-exit-notify
hand-window      90
keepalive        10 60
nobind
persist-key
persist-tun
proto            udp
remote           caipirinha.spdns.org 1194
remote-cert-tls  server
reneg-sec        86400
script-security  2
verb             1

<ca>
-----BEGIN CERTIFICATE-----
MIIE2D...NNmlTg=
-----END CERTIFICATE-----
</ca>

<cert>
-----BEGIN CERTIFICATE-----
MIIFJj...nbuzbI=
-----END CERTIFICATE-----
</cert>

<key>
-----BEGIN PRIVATE KEY-----
MIIEvA...QcO+Q==
-----END PRIVATE KEY-----
</key>
TCP-based VPN, full tunneling
# Konfigurationsdatei für den openVPN-Client auf ...

client
dev              tun
hand-window      90
keepalive        10 60
nobind
persist-key
persist-tun
proto            tcp
remote           caipirinha.spdns.org 8080
remote-cert-tls  server
reneg-sec        86400
script-security  2
verb             1

<ca>
-----BEGIN CERTIFICATE-----
MIIE2D...NNmlTg=
-----END CERTIFICATE-----
</ca>

<cert>
-----BEGIN CERTIFICATE-----
MIIFJj...nbuzbI=
-----END CERTIFICATE-----
</cert>

<key>
-----BEGIN PRIVATE KEY-----
MIIEvA...QcO+Q==
-----END PRIVATE KEY-----
</key>
The following points proved to be useful for me:
- Rather than using separate files for the ca, the certificate, and the key of the client, all information can actually be packed into one file which then gives a complete configuration of the client. This eases the installation on mobile clients (smartphones, tablets) as you do not have to consider path names on the target device. For security reasons, the respective code blocks are not printed here.
- It is possible to use several remote statements. You can refer to different servers (if the client configuration is suitable for the servers) or you can name the very same server with different ports. On my server, I have different ports open which all point to the very same 4 different server processes. The reason is that sometimes, the dedicated openvpn port 1194 is blocked in some geographies, but other ports might still work. In that case, you have to ensure that connections coming to all these ports are mapped back to the port of the server process. And you might include the statement remote-random so that one connection of the ones listed is chosen randomly.
- On the client, is it normally not necessary to bind the openvpn process to a certain tun device or a certain port, different from the VPN server.
Further Improvements (OpenVPN)
Different network conditions might require tweaking one or the other parameters of the openvpn service. [8], [9], [10] contain some indications, especially with respect to different hardware and network conditions.
Dedicated Configurations
As mentioned above, the client-config-dir directive can be used to refer to a folder that contains configurations for dedicated devices. An example is the file /etc/openvpn/conf-1194/Gabriel-SM960F. It contains the content:
# Spezielle Konfigurationsdatei für Gabriels Galaxy Note 9 (gabriel-SM-N960F)
#

ifconfig-push      192.168.10.251  255.255.255.0
ifconfig-ipv6-push fd01:0:0:a:0:0:1:fb/111 fd01:0:0:a::1
This file makse the device with the client certificate named gabriel-SM-N960F always receive the same IP addresses, namely 192.168.10.251 (IPv4) and fd01:0:0:a:0:0:1:fb (IPv6). The name of the file must exactly match the VPN client’s common name (CN) that was defined when the client certificate was created [5].
WireGuard Server Configuration
WireGuard is a new and promising VPN protocol [15] which is not yet as widespread as openvpn; it may therefore “escape” censorship authorities easier than openvpn which can be detected by statistical analysis [16]. The setup of the server is described in [12], [13], a more complex configuration is described in [19]. A big advantage of WireGuard is also that the code base is very lean, and hence performance on any given platform is higher than with openvpn.
I personally find it unusual that you have to list the clients in the server configuration file rather than just having a general server configuration where any number of allowed clients can connect to. On my Linux server caipirinha.spdns.org, the WireGuard server configuration contains of 3 files:
- /etc/wireguard/wg_caipirinha_public.key is the public key of the service (the generation is described in [12], [13], [19]).
- /etc/wireguard/wg_caipirinha_private.key is the private key of the service (the generation is described in [12], [13], [19]).
- /etc/wireguard/wg0.conf is the configuration file (the network device is named “wg0” on my machine).
Similar to the openvpn configurations described above, I spent a dedicated IPv4 and IPv6 subnet for the WireGuard server, in this case 192.168.14.0/24 and fd01:0:0:e::/64. The configuration file /etc/wireguard/wg0.conf is easy to understand and contains important parameters that shall be discussed below:
[Interface]
Address = 192.168.14.1/24,fd01:0:0:e::1/64
ListenPort = 44576
PrivateKey = SHo...

[Peer]
PublicKey = pjp2PEboXA4RJhVoybXKuicNkz4XDZaW+c9yLtJq1gE=
AllowedIPs = 192.168.14.2/32,fd01:0:0:e::2/128
PersistentKeepalive = 30
...
[Peer]
PublicKey = fcEcFYQ6cOqe7H9L2PvkM78mkKottJLnKwiqp4WO91s=
AllowedIPs = 192.168.14.7/32,fd01:0:0:e::7/128
PersistentKeepalive = 30
...
The section [Interface] describes the server setup:
- Address lists the server’s IPv4 and IPv6 addresses.
- ListenPort is the UDP port on which the service will listen.
- PrivateKey is the private server key (can be read from the file /etc/wireguard/wg_caipirinha_private.key). For security reasons, the key has only been displayed partly here.
Each section [Peer] lists a possible client configuration. If you want to enable 10 clients on your server, you therefore need 10 such sections.
- PublicKey is the public key of the client.
- AllowedIPs lists the IPv4 and IPv6 addresses which will be allocated to the client upon connection.
- PersistentKeepalive configures the time in seconds after which “keep-alive packets” will be exchanged between the server and the client. This helps to keep connection settings on gateways that are in between the VPN client and the VPN server open; often firewalls and routers in between might otherwise delete the connection from their tables. A value of 25…30 is recommended.
WireGuard Client Configuration
WireGuard clients exist for all major operating systems. I would like to show a Windows 10 configuration that I set up on one of my notebooks according to [14].
As we can see, I also named the respective network interface on the client wg0, but you can use any other name, too. The detailed configuration of the only client connection is also easy to understand:
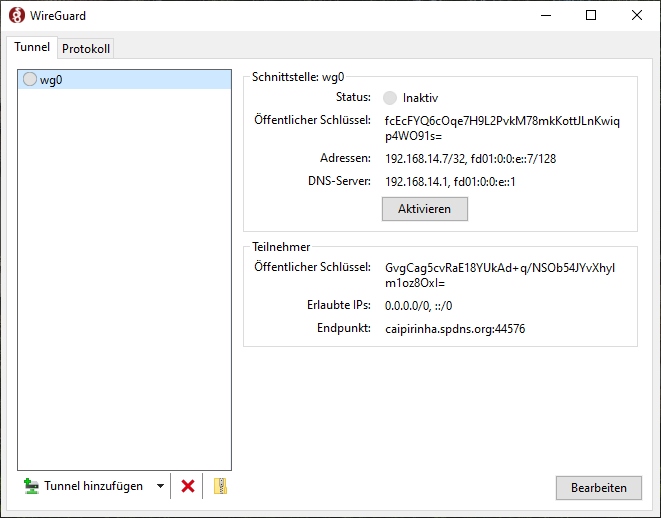
[Interface]
PrivateKey = 2B2...
Address = 192.168.14.7/32, fd01:0:0:e::7/128
DNS = 192.168.14.1, fd01:0:0:e::1

[Peer]
PublicKey = GvgCag5cvRaE18YUkAd+q/NSOb54JYvXhylm1oz8OxI=
AllowedIPs = 0.0.0.0/0, ::/0
Endpoint = caipirinha.spdns.org:44576
The section [Interface] describes the client setup:
- PrivateKey is the private key of the client which is generated in the application itself [14]. For security reasons, the key has only been displayed partly here.
- Address lists the client’s IPv4 and IPv6 addresses.
- DNS lists the DNS servers which shall be used when the VPN connection is active. In this case, the Linux server caipirinha.spdns.org has a DNS service running, hence I listed the server IPv4 and IPv6 addresses here. You might also use Google’s DNS with the IPv4 addresses 8.8.8.8, 8.8.4.4, for example. It is important to list the DNS servers as the ones that you were using before the VPN was established (e.g., the router’s IP like 192.168.4.1) might no longer be accessible after the VPN has been established.
The section [Peer] contains information related to the server.
- PublicKey is the public key of the server which is located on the server in the file /etc/wireguard/wg_caipirinha_public.key.
- AllowedIPs is set to 0.0.0.0/0, ::/0 on this client which means that all traffic shall be sent via the VPN (fully tunneling VPN). Here, you have the chance to move from a fully tunneling VPN to a split VPN by listing subnets like 192.168.2.0/24, for example.
- Endpoint lists the server FQDN and the port to which the client shall connect to.
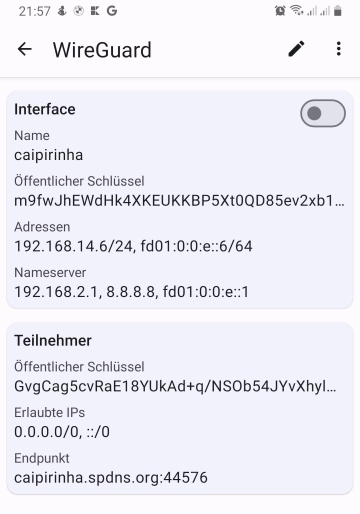
In a similar way, I set up another client on an Android smartphone using the official WireGuard – Apps bei Google Play, following the configuration model at [23].
Let’s see how that works out in reality. For the experiment, I am in Brazil and connect to my Linux server caipirinha.spdns.org in Germany with the configurations described above. Once, the connection has been established, I do a traceroute in Windows to www.google.com in IPv4 and IPv6:
C:\Users\Dell>tracert www.google.com

Routenverfolgung zu www.google.com [142.250.185.68]
über maximal 30 Hops:

  1   235 ms   236 ms   236 ms  CAIPIRINHA [192.168.14.1]
  2   241 ms   238 ms   238 ms  Router-EZ [192.168.2.1]
  3   259 ms   248 ms   249 ms  fra1813aihr002.versatel.de [62.214.63.145]
  4   250 ms   249 ms   248 ms  62.214.38.105
  5   249 ms   247 ms   249 ms  72.14.204.149
  6   249 ms   250 ms   251 ms  72.14.204.148
  7   249 ms   249 ms   248 ms  108.170.236.175
  8   251 ms   249 ms   250 ms  142.250.62.151
  9   248 ms   247 ms   247 ms  fra16s48-in-f4.1e100.net [142.250.185.68]

Ablaufverfolgung beendet.

C:\Users\Dell>tracert -6 www.google.com

Routenverfolgung zu www.google.com [2a00:1450:4001:829::2004]
über maximal 30 Hops:

  1   235 ms   235 ms   235 ms  fd01:0:0:e::1
  2   239 ms   239 ms   237 ms  2001:16b8:30b3:f100:3681:c4ff:fecb:5780
  3   249 ms   249 ms   247 ms  2001:1438::62:214:63:145
  4   248 ms   249 ms   247 ms  2001:1438:0:1::4:302
  5   250 ms   248 ms   248 ms  2001:1438:1:1001::1
  6   250 ms   249 ms   248 ms  2001:1438:1:1001::2
  7   252 ms   250 ms   249 ms  2a00:1450:8163::1
  8   250 ms   249 ms   250 ms  2001:4860:0:1::5894
  9   248 ms   250 ms   251 ms  2001:4860:0:1::5009
 10   250 ms   249 ms   249 ms  fra24s06-in-x04.1e100.net [2a00:1450:4001:829::2004]

Ablaufverfolgung beendet.

C:\Users\Dell>
We can see a couple of interesting points:
- The latency from Brazil to my server is already > 200 ms, that is not a very competitive connection.
- Despite the fact that between my Linux server caipirinha.spdns.org and Google, there are a range of machines, that connections has quite a low (additional) latency.
Let’s now switch off the VPN and do a traceroute to www.google.com directly from the local ISP:
C:\Users\Dell>tracert www.google.com

Routenverfolgung zu www.google.com [172.217.29.100]
über maximal 30 Hops:

  1    <1 ms    <1 ms    <1 ms  fritz.box [192.168.4.1]
  2     1 ms    <1 ms    <1 ms  192.168.100.1
  3     4 ms     4 ms     3 ms  179-199-160-1.user.veloxzone.com.br [179.199.160.1]
  4     5 ms     5 ms     4 ms  100.122.52.96
  5    12 ms     6 ms     5 ms  100.122.25.245
  6    11 ms    11 ms    11 ms  100.122.17.180
  7    12 ms    12 ms    12 ms  100.122.18.52
  8    12 ms    11 ms    11 ms  72.14.218.158
  9    14 ms    13 ms    14 ms  108.170.248.225
 10    15 ms    14 ms    14 ms  142.250.238.235
 11    13 ms    13 ms    13 ms  gru09s19-in-f100.1e100.net [172.217.29.100]

Ablaufverfolgung beendet.
For this test, only IPv4 was possible as I did not have IPv6 connection at the Ethernet port where my notebook was connected to. The overall connection is much faster, and we can clearly identify that it uns in the Brazilian internet (“179-199-160-1.user.veloxzone.com.br”).
Further Improvements (WireGuard)
A range of graphical user interfaces (GUIs) for the configuration of WireGuard have come up that seek to overcome the need to deal with various configuration files on the server and the client side and align public keys and IP addresses. [17] compares some GUIs for WireGuard, [18] shows a further possibility.
Configuring Network Address Translation (NAT)
Additionally, to the configuration of the VPNs (and their respective start on the VPN server), we need to set up network address translation so that connections from the VPN networks are translated to the SoHo network. This is done with the sequence:
readonly STD_IF='eth0'
…
iptables -t nat -F
iptables -t nat -A POSTROUTING -s 192.168.10.0/24 -o ${STD_IF} -j MASQUERADE
iptables -t nat -A POSTROUTING -s 192.168.11.0/24 -o ${STD_IF} -j MASQUERADE
iptables -t nat -A POSTROUTING -s 192.168.12.0/24 -o ${STD_IF} -j MASQUERADE
iptables -t nat -A POSTROUTING -s 192.168.13.0/24 -o ${STD_IF} -j MASQUERADE
iptables -t nat -A POSTROUTING -s 192.168.14.0/24 -o ${STD_IF} -j MASQUERADE
…

# Setup the NAT table for the VPNs.
ip6tables -t nat -F
ip6tables -t nat -A POSTROUTING -s fd01:0:0:a::/64 -o ${STD_IF} -j MASQUERADE
ip6tables -t nat -A POSTROUTING -s fd01:0:0:b::/64 -o ${STD_IF} -j MASQUERADE
ip6tables -t nat -A POSTROUTING -s fd01:0:0:c::/64 -o ${STD_IF} -j MASQUERADE
ip6tables -t nat -A POSTROUTING -s fd01:0:0:d::/64 -o ${STD_IF} -j MASQUERADE
ip6tables -t nat -A POSTROUTING -s fd01:0:0:e::/64 -o ${STD_IF} -j MASQUERADE
...
Conclusion
The VPN configuration mentioned above shows how to set up different VPNs that allow dual stack operations on a Linux server. Thus, VPN clients can initiate connections in IPv4 or IPv6 mode using the assigned IP addresses from a private address space; the configured network address translation (NAT) translates the connections to a real-world IP address on the server.
Outlook
The VPN server itself can also act as VPN client itself, and so, the connection from the original VPN client can be forwarded via other VPNs to other countries allowing the original VPN client to appear in different geographies depending upon the destination address of its outgoing connection. This can be useful in order to circumvent geo-blocking of media content, for example.
Sources
- [1] = Unique local address [Wikipedia]
- [2] = IPv6: Basics
- [3] = Stateless address autoconfiguration (SLAAC)
[4] = OpenVPN / easy-rsa-old [Github](superseded)- [5] = Instalando e configurando o OpenVPN
- [6] = OpenVPN Traffic Identification Using Traffic Fingerprints and Statistical Characteristics
- [7] = Internet Censorship in China
- [8] = Improving OpenVPN performance and throughput
- [9] = Optimizing OpenVPN Throughput
- [10] = Optimizing performance on gigabit networks
- [11] = Setting up your own Certificate Authority (CA) and generating certificates and keys for an OpenVPN server and multiple clients
- [12] = WireGuard Quick Start
- [13] = How to setup a VPN server using WireGuard (with NAT and IPv6)
- [14] = How to configure a WireGuard Windows 10 VPN client
- [15] = WireGuard vs OpenVPN: 7 Big Difference
- [16] = OpenVPN Traffic Identification Using Traffic Fingerprints and Statistical Characteristics
- [17] = Wireguard GUIs im Vergleich
- [18] = WireGuard VPN Server mit Web Interface einrichten
- [19] = WireGuard [ArchWiki]
- [20] = Home – Easy RSA (easy-rsa.readthedocs.io)
- [21] = Easy-RSA – ArchWiki (archlinux.org)
- [22] = GitHub – OpenVPN/easy-rsa: easy-rsa – Simple shell based CA utility
- [23] = DualStack VPN mit Wireguard – sebastian heg.ge