Getting around Corporate VPN Restrictions
Executive Summary
This blog post explains how Policy Routing on a Linux server in the Home Office can help you to bypass access restrictions by a corporate VPN to your local LAN.
Background
The need for this approach surged when I realized that while being in the corporate VPN with my company notebook, I could not access my home network anymore.
Preconditions
In order to use the approach described here, you should:
- … have access to a Linux machine which is already properly configured on its principal network interface (e.g., eth0) and which has an additional network card (e.g., eth1) available
- … have knowledge of routing concepts, networks, some understanding of shell scripts and configuration files
- … have already setup meaningful services like NTP, samba or MariaDB / MySQL on the Linux machine
- … know related system commands like sysctl
- … familiarize yourself with [1] and read at least a bit through [2]
Description and Usage
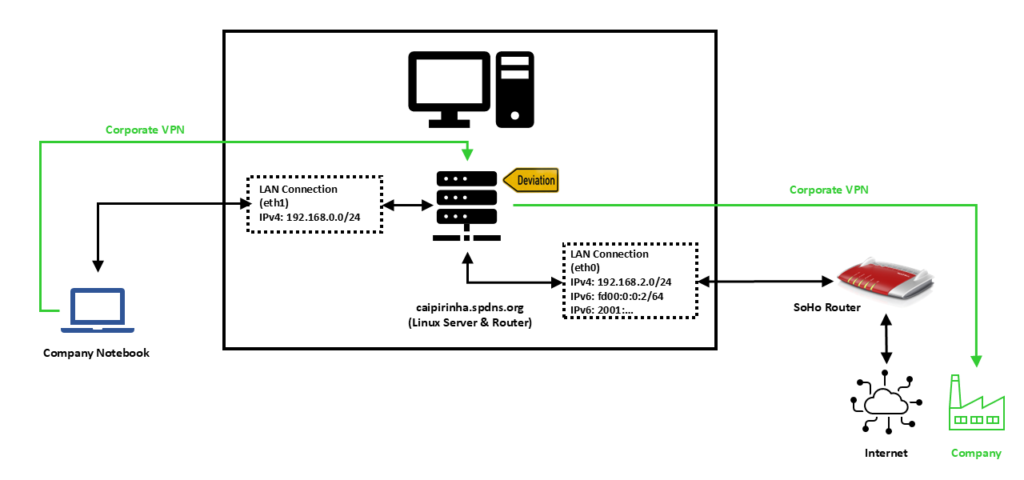
In this setup, we have a full-blown SoHo Linux server on an internal network 192.168.2.0/24 that is also used by all other devices in the same home. For the approach described here, this Linux server needs to be equipped with an additional network card (eth1), and we will use this connection exclusively in order to connect the company notebook. A DHCP and DNS server on the Linux server shall span the network 192.168.0.0/24 on the interface eth1, and the company notebook will get an IP address in this network. We assume that for remote work (Home Office), the user has to use a corporate VPN which is then channeled through our Linux server. For the approach described here, it is important that the corporate VPN on the company notebook does not channel all traffic of the company notebook through the VPN, but that it is a split VPN that leaves some routes outside of the VPN. Many corporate VPN are essentially split VPN and typically exclude IP ranges that connect to Microsoft® services (M365, Teams, SharePoint, etc.) or dedicated streaming services used by the company so that this traffic is not led through the company (it would anyway be fed into the company and directly be sent out to Microsoft® only using precious bandwidth of the company’s internet connection). We will single out one IP address of the IP ranges that are outside the corporate VPN and use the fact that legitimate traffic which might go to this IP address almost certainly will be either on port 80 (http) or on port 443 (https). An iptables command will help us to deviate traffic on this one IP address that shall go to dedicated services on our Linux server.
We need some auxiliary services in order to make things work perfectly, and they are described in the following sections.
Setting up eth1
The first step is to set up the interface eth1 and to assign static IP addresses for IPv4 and IPv6. In order to make life easy for me, I use YaST2 on my openSuSE system and assign the addresses 192.168.0.1 and fd00::1 to the Linux server on eth1.

Providing DHCP and DNS on eth1
The company notebook needs to get an IP address when it is booted up, and since it is connected only to eth1 on the Linux server, this means that the Linux server shall provide an IP address via DHCP so that we do not have to configure a static IP on the company notebook. The package dnsmasq can provide both DHCP as well as cache DNS. That is very practical as it allows us for example, to have only DNS on eth0 where the SoHo router already is the DHCP master, but to configure both DHCP and a caching DNS on eth1. The following configuration file will exactly do that (it uses only a subset of the capabilities of dnsmasq):
/etc/dnsmasq.conf
# Never forward addresses in the non-routed address spaces.
bogus-priv

# If you don't want dnsmasq to read /etc/resolv.conf or any other
# file, getting its servers from this file instead (see below), then
# uncomment this.
no-resolv

# If you don't want dnsmasq to poll /etc/resolv.conf or other resolv
# files for changes and re-read them then uncomment this.
no-poll

# Add other name servers here, with domain specs if they are for
# non-public domains.
server=8.8.8.8
server=8.8.4.4
server=9.9.9.9
server=1.1.1.1

# If you want dnsmasq to listen for DHCP and DNS requests only on
# specified interfaces (and the loopback) give the name of the
# interface (eg eth0) here.
# Repeat the line for more than one interface.
interface=eth0
interface=eth1

# If you want dnsmasq to provide only DNS service on an interface,
# configure it as shown above, and then use the following line to
# disable DHCP and TFTP on it.
no-dhcp-interface=eth0

# Uncomment this to enable the integrated DHCP server, you need
# to supply the range of addresses available for lease and optionally
# a lease time. If you have more than one network, you will need to
# repeat this for each network on which you want to supply DHCP
# service.
dhcp-range=tag:eth1,192.168.0.10,192.168.0.254,24h

# Enable DHCPv6. Note that the prefix-length does not need to be specified
# and defaults to 64 if missing/
dhcp-range=tag:eth1,fd00:0:0:0::A, fd00:0:0:0::C8, 64, 24h

# Assign a pseudo-static IPv4 to the the company notebook identified by its MAC.
# Assign a pseudo-static IPv6 to the the company notebook identified by its DUID.
# Note the MAC addresses CANNOT be used to identify DHCPv6 clients.
dhcp-host=80:3f:5d:d2:4b:57,FHD4QV3,192.168.0.195,24h
dhcp-host=id:00:01:00:01:2c:e6:bc:51:ac:91:a1:61:03:30,FHD4QV3,[fd00::c3/64]

# Set the NTP time server addresses
dhcp-option=option:ntp-server,192.168.2.3

# Send Microsoft-specific option to tell windows to release the DHCP lease
# when it shuts down. Note the "i" flag, to tell dnsmasq to send the
# value as a four-byte integer - that's what Microsoft wants. See
# https://learn.microsoft.com/en-us/openspecs/windows_protocols/ms-dhcpe/4cde5ceb-4fc1-4f9a-82e9-13f6b38d930c
dhcp-option=vendor:MSFT,2,1i

# Include all files in a directory which end in .conf
conf-dir=/etc/dnsmasq.d/,*.conf
In this configuration, we can see that on eth0, we will not enable DHCP (Option no-dhcp-interface=eth0). On eth1, we want DHCP to be active. Furthermore, we propagate the server’s address 192.168.2.3 as NTP server. For this, the NTP service needs to be enabled, of course, otherwise that would be pointless.
With the configuration option dhcp-host, we can assign a pseudo-static IPv4 address (192.168.0.195) to the company notebook identified by its MAC address. And using the same option for a second time, we can also assign a pseudo-static IPv6 address to the company notebook. However, in order to accomplish this, we need to know the DHCP Unique Identifier (DUID) of the company notebook. With dnsmasq, we can obtain the DUID by leaving out the option dhcp-host at first and then scanning in the log file of dnsmasq (or, in the syslog if no dedicated log file has been specified) which DUID the notebook has. In the log file, we might find entries like:
2026-02-27T09:51:39.478262+01:00 caipirinha dnsmasq-dhcp[14776]: DHCPSOLICIT(eth1) 00:01:00:01:2c:e6:bc:51:ac:91:a1:61:03:30
2026-02-27T09:51:39.478460+01:00 caipirinha dnsmasq-dhcp[14776]: DHCPADVERTISE(eth1) fd00::c3 00:01:00:01:2c:e6:bc:51:ac:91:a1:61:03:30 fhd4qv3
The DUID can then be identified as 00:01:00:01:2c:e6:bc:51:ac:91:a1:61:03:30.
dnsmasq uses the file /etc/hosts as well as upstream DNS servers for its own DNS service. The advantage of this is that – if your file /etc/hosts is properly maintained – you can also use the device names listed there. As upstream DNS servers from which dnsmasq itself gets the IP resolution, I have configured four popular ones (8.8.8.8, 8.8.4.4, 9.9.9.9, 1.1.1.1), but you could also just list the IP of your SoHo router or of the DNS resolver of your internet provider.
Providing web proxy services
If we want to use unrestricted and unfiltered internet also on the company notebook, then we need to set up a web proxy on our Linux server and use a separate browser on the company notebook on which we configure the Linux server as web proxy. As on company notebooks, you might not be allowed to install software by yourself, Mozilla Firefox, Portable Edition might be an option. This is a browser that does not require installation but can just be placed on the hard disk of the company notebook. In this browser, you can configure a dedicated proxy server without having to change the system configuration or default proxy setting of the company notebook. On the Linux server, the package tinyproxy is an easy-to-configure and lightweight proxy server well suited for our purpose. Below is a typical configuration of tinyproxy. The configuration option Port sets the port on which tinyproxy will listed for incoming connections, in our case I chose 4077.
/etc/tinyproxy.conf
# User/Group: This allows you to set the user and group that will be
# used for tinyproxy after the initial binding to the port has been done
# as the root user. Either the user or group name or the UID or GID
# number may be used.
#
User tinyproxy
Group tinyproxy

# Port: Specify the port which tinyproxy will listen on.  Please note
# that should you choose to run on a port lower than 1024 you will need
# to start tinyproxy using root.
#
Port 4077

# Bind: This allows you to specify which interface will be used for
# outgoing connections.  This is useful for multi-home'd machines where
# you want all traffic to appear outgoing from one particular interface.
#
Bind 192.168.2.3

# Timeout: The maximum number of seconds of inactivity a connection is
# allowed to have before it is closed by tinyproxy.
#
Timeout 600

# LogFile
#
LogFile "/var/log/tinyproxy/tinyproxy.log"

# LogLevel: Warning
#
# Set the logging level. Allowed settings are:
#	Critical	(least verbose)
#	Error
#	Warning
#	Notice
#	Connect		(to log connections without Info's noise)
#	Info		(most verbose)
#
LogLevel Warning

# PidFile
#
PidFile "/var/run/tinyproxy/tinyproxy.pid"

# XTinyproxy: Tell Tinyproxy to include the X-Tinyproxy header, which
# contains the client's IP address.
#
XTinyproxy Yes

# MaxClients: This is the absolute highest number of threads which will
# be created. In other words, only MaxClients number of clients can be
# connected at the same time.
#
MaxClients 400

# Allow: Customization of authorization controls. If there are any
# access control keywords then the default action is to DENY. Otherwise,
# the default action is ALLOW.
#
Allow 127.0.0.1
Allow ::1
Allow 192.168.0.0/16

# ViaProxyName: The "Via" header is required by the HTTP RFC, but using
# the real host name is a security concern.  If the following directive
# is enabled, the string supplied will be used as the host name in the
# Via header; otherwise, the server's host name will be used.
#
ViaProxyName "tinyproxy"

# Filter: This allows you to specify the location of the filter file.
#
Filter "/etc/tinyproxy/filter"

# FilterURLs: Filter based on URLs rather than domains.
#
FilterURLs On

# FilterDefaultDeny: Change the default policy of the filtering system.
# If this directive is commented out, or is set to "No" then the default
# policy is to allow everything which is not specifically denied by the
# filter file.
#
# However, by setting this directive to "Yes" the default policy becomes
# to deny everything which is _not_ specifically allowed by the filter
# file.
#
FilterDefaultDeny No
tinyproxy also allows filtering of internet domains. I know I said before that we want unrestricted and unfiltered internet access, but in this case, we can use the file /etc/tinyproxy/filter in order to filter out nasty and annoying advertisement and tracking domains. Suitable filter lists can be found on the internet and can just be copied to /etc/tinyproxy/filter. Or you might add just these domains whose advertisements annoy you most when you access web pages. I personally use a mixture of both.
Re-routing traffic to our server
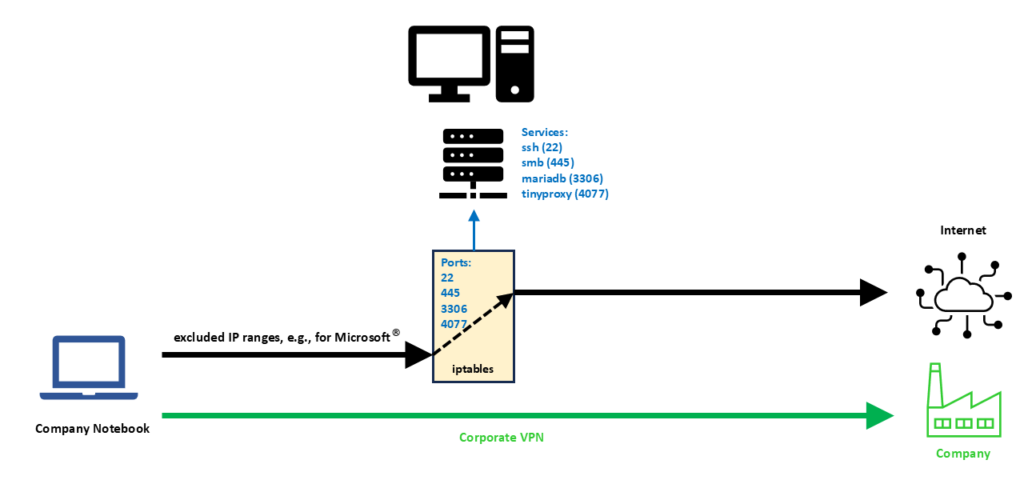
In my personal case, the corporate VPN client (a Cisco VPN client) is so helpful that it provides me with the IP ranges that are excluded from the corporate VPN. Out of these IP ranges, I did pick one IP address, in my case, 192.229.232.200. The selection was completely arbitrary; I could have chosen any other IP address from the IP ranges that are excluded from the corporate VPN. The following commands prepare the Linux server for our desired setup:
ip link set eth1 up
iptables -t nat -A POSTROUTING -s 192.168.0.0/24 -o eth0 -j SNAT --to-source 192.168.0.1
ip6tables -t nat -A POSTROUTING -s fd00:0:0:0::/64 -o eth0 -j MASQUERADE
iptables -t nat -A PREROUTING -i eth1 -p tcp -d 192.229.232.200 --match multiport --dports 22,445,3306,4077 -j DNAT --to 192.168.2.3
systemctl start dnsmasq.service
systemctl start tinyproxy.service
Let us discuss these commands in detail:
- The first command brings up the network interface eth1. This command might not be necessary if you have a switch connected to eth1 of the Linux Server or if the company notebook is powered up before you boot up the Linux server. Otherwise, if you boot up the Linux server and nothing is connected to eth1, the interface might not come up.
- The second command translates traffic from the network on eth1 to the SoHo network 192.168.2.0/24 and to the Linux server’s address on that network (192.168.2.3). Of course, IPv4 routing needs to be enabled on the Linux server. This command enables that (even without the corporate VPN active), the company notebook can get access to the internet from its otherwise isolated network 192.168.0.0/24.
- The third command does the same for the IPv6 domain and the network fd00:0:0:0::/64 on eth1. Probably we would not even need IPv6 on the network of the company notebook, few companies already work with IPv6. If we leave IPv6 away, we should however also delete the configuration option dhcp-host for IPv6 in /etc/dnsmasq.conf.
- The fourth command is very important. It tells the server to deviate connections on one of the TCP ports 22, 445, 3306, 4077 originally destined to the IP address 192.229.232.200 to the new IP address 192.168.0.1, the IP address of the Linux server on eth1.
- The fifth and sixth command start the services dnsmasq and tinyproxy.
We can see from the fourth command that the scope for deviating connections to the Linux server is very narrow. First, we only consider TCP connections, and we single out only four IP ports that probably otherwise would not be used in conjunction with the IP address 192.229.232.200. With this, we can access the following services on our Linux server:
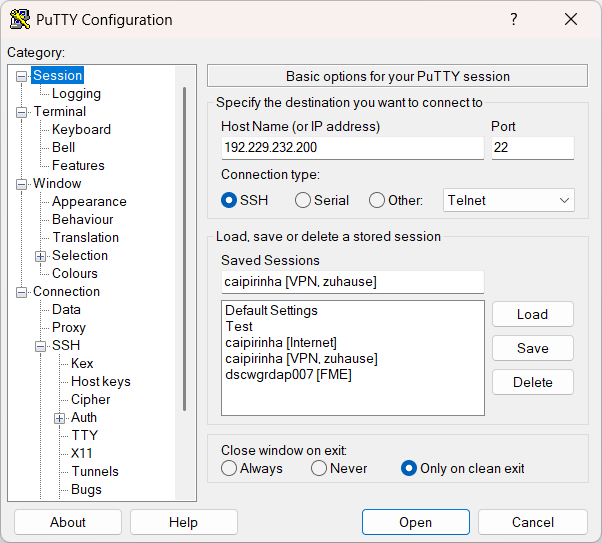
- ssh (Port 22): On the company notebook, we have to configure our ssh client (e.g., puTTY) for a connection to 192.229.232.200:22.
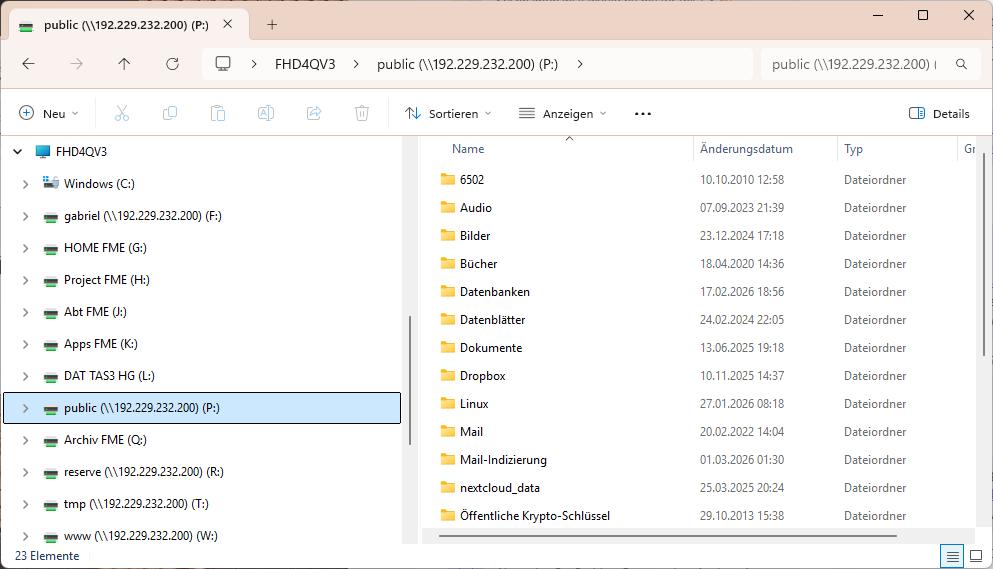
- smb (Port 445): Of course, the Linux server must have a smb service running already; the configuration of it is not part of this article. Then, on the company notebook, we can access a network drive by using \\192.229.232.200\network_share.
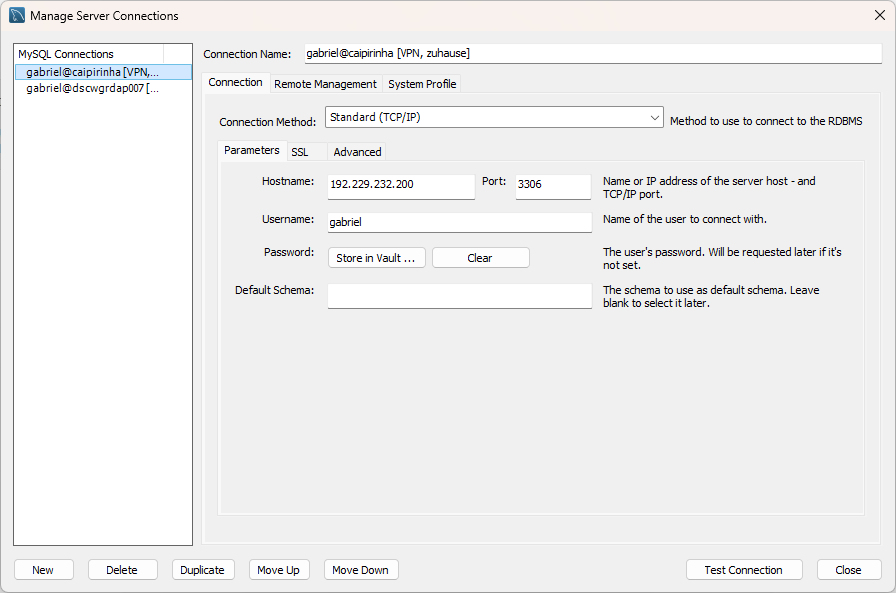
- mariadb / mysql (Port 3306): Of course, the Linux server must have a mysql service running already; the configuration of it is not part of this article. Then, on the company notebook, we can access the service for example with the MySQL Workbench by connecting to 192.229.232.200:3306.
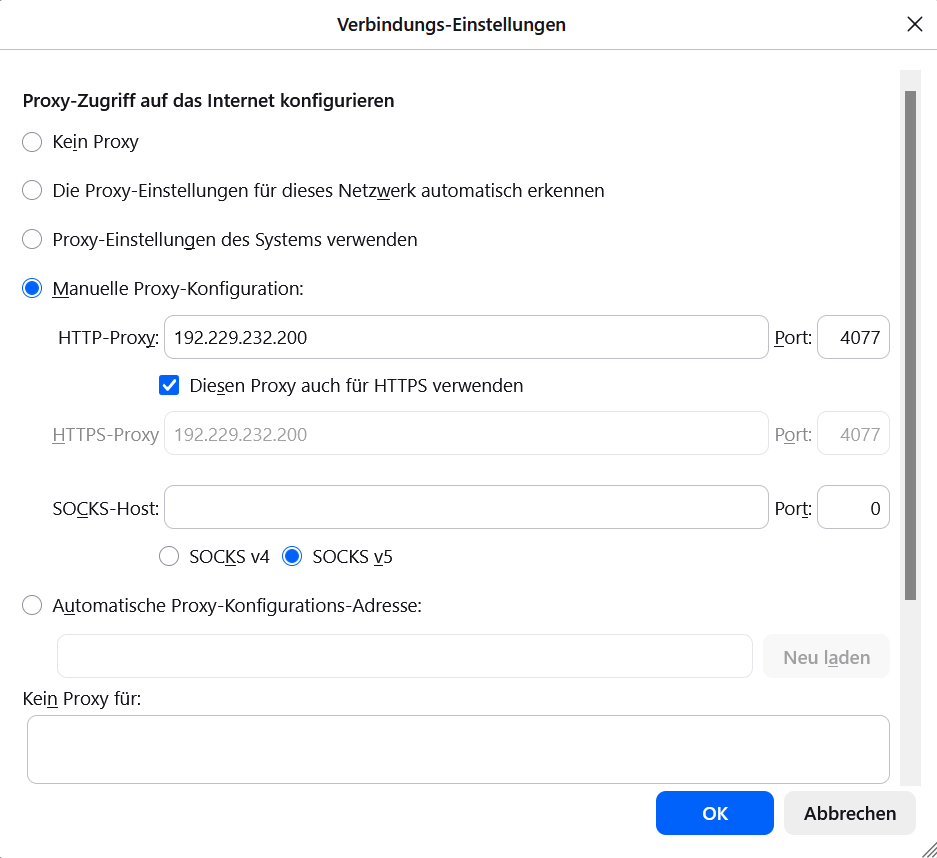
- tinyproxy (Port 4077): We configure Mozilla Firefox, Portable Edition and set the proxy to 192.229.232.200, Port 4077 for both http and https.
The following images show the configuration of related programs and apps on the company notebook.
Of course, you can modify the iptables command (fourth command above) to deviate even more ports, depending on the services that you have available on your own Linux server.
Conclusion
With a second LAN, DHCP, DNS, a proxy server like tinyproxy, some clever commands and a split corporate VPN, we can bypass corporate VPN restrictions that would not allow us to access our local network and services on our Linux server otherwise. With an additional browser on the company notebook like Mozilla Firefox, Portable Edition, this will even enable us to bypass restrictions and browsing policies that corporations might have put forward.
Having said that, I would always recommend you stick to the IT regulations of your company, of course…